As a network grows, inevitably you'll need to make changes to the TCP/IP
addressing scheme. In this process, you might end up adding equipment that
stretches the original scheme to the limit. Or your company might acquire
another company with an IP addressing scheme that conflicts with yours. With
a bit of planning and a methodology in place, you can make this process easier
by quickly getting your IP addressing scheme cut over so that you can become
part of the bigger network and not a sore spot on the topology map. Here’s
how to do it.
Get ready
Before beginning, you’ll need to do a bit of advance work. Make sure you cover
all bases, including the following:
- Get a full topology map featuring all the systems and where they are located.
- Have a spreadsheet or database with all current addressing.
- Have a spreadsheet or database of the new range you want to move to.
- Don't forget to set up your DHCP server scopes.
- Cut over the DNS zone(s), and add new resource records where needed.
- Don’t leave out statically assigned systems—secondary-address them instead.
- Check your route tables on your routers to ensure communications.
- Build a project plan and a project team—everyone must be involved.
- Look at your applications. Many times, applications have IP assignments.
- Test everything in your new range and make sure everything works.
Plan and design
To start, you need to build a solid topology map. Often, many networks today
suffer from poorly kept and inadequately updated network documentation, so
you’ll need to make sure you aren’t working with this type of documentation.
You need to know what the network looks like from a very high level so you
don't miss anything. In Figure A, you can see how simple it is to make
a quick map to ensure that you don’t miss any segment or devices on your network.
I have outlined a simple network map here, but you can make this as complex
as you need to, depending on what you need to see and the size of your network.
| Figure A |
| |
| You’ll need to make a basic topology map like this one. |
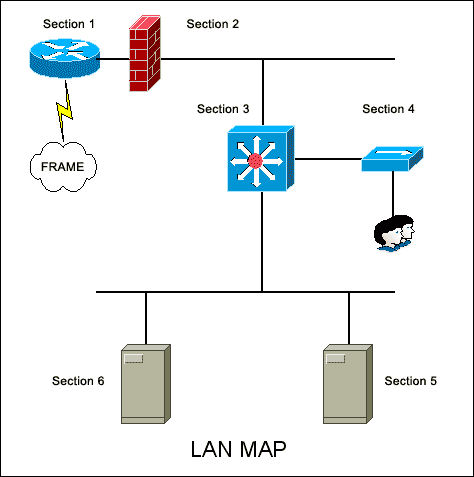
The whole point of the map is that you can attack sections of the network
as a whole. On my map, I have outlined sections labeled with numbers. Here
is a breakdown of those sections:
- Section 1: Frame relay router and LAN gateway
- Section 2: Firewall to protect the internal LAN
- Section 3: Core switch where all devices are centrally connect on the LAN
- Section 4: A hub, user access into the LAN to access shared resources
- Section 5: A server on the LAN (statically assigned IP)
- Section 6: A server on the LAN (statically assigned IP)
With a map of your network in hand, you can easily create a spreadsheet, hand
out team assignments, and assign sections of the LAN to be cut over by team
members.
To further plan this cutover, involve the entire MIS staff. Make sure you
involve everyone who is responsible for applications and systems so that when
you flip the switch, you have people around that will be able to help on a
very granular level. For example, you may have an application on a mainframe
that has a hard-coded IP address on it. If you need that changed (something
you may not have planned for), you will, of course, need help from whoever
has access to that system and whoever knows how to change the application
as well.
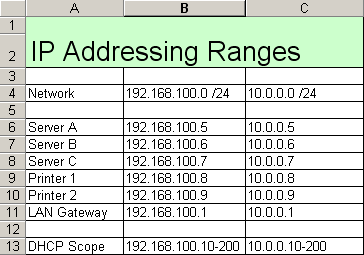
Next, to get your spreadsheets in order with the current IP addressing scheme,
you need to add the following to the spreadsheets:
- IP address subnets in use
- Static IP assignments
- DHCP scopes
- DNS records
- Printers and other static devices on your network
Once you have this spreadsheet, similar to the one in Figure B, you
can add the new range next to it and you are ready to go.
| Figure B |
| |
| Here is an example of a LAN addressing spreadsheet. |
Now that your documentation is coming together, make sure you can get the
plan out to others by developing a project plan. You do not need to specifically
use Microsoft Project, but you can if you have it available. In any case,
you need a documented plan, and since you will be making a severe change on
the network, you will have to implement a change control procedure.
Change control is the documentation of what currently exists on the plan.
This is augmented by strict backout plans. In other words, if the project
fails, you then have a documented fallback plan. Most likely, the reverse
of the cutover plan will be the backout plan. Be certain that everyone knows
how to fall back if you run into a major problem.
Make sure you are not forgetting anything. Remember, all networks are different,
and it is wise to have senior network personnel available to help you through
this if you don't know the network very well. When you flip the switch, you
may be faced with some problems, such as applications that don’t work because
you didn’t think about the network’s impact on them.
Static assignments
Once you have the documentation in place, have assembled the team, and have
gathered your nerves of steel, it’s time to begin the cutover. Your next step
is to deal with the hard-coded devices on the network. Hard-coded simply means
that the addresses assigned do not change and are not handed out by DHCP.
If you want them to be changed, you must change them manually. This is not
a bad thing, because when you are using printers, routers, servers, and anything
else that you go to for resources as a client, you want the address to always
be the same. If a server that you access by IP address suddenly gets a new
address from DHCP, then you are not going to be able to get to it.
With this in mind, you now have a problem with cutting over your network from
one IP address range to another. Because of the hard-coded nature of these
addresses, you will have to visit each server and manually add the addresses.
If you have a LAN with two or three servers, this is not a big deal, but what
about networks that have 10 servers, 20 printers, and many more static devices?
You could schedule a day's worth of downtime to get them all changed over,
or you could add another IP address to them all so they could be accessed
by both IP address ranges. To explain this second example, let’s look at how
to statically assign two IP addresses to a Cisco router and also to a Windows
2000 server.
Applying secondary addressing to a Cisco router
To assign multiple IP addresses to network interfaces, use the following command
in interface configuration mode, as shown here:
Router (config-if)#ip address ip-address mask secondary
It may look like this:
Router (config-if)#ip address 10.0.0.1 255.255.255.0 secondary
Applying secondary addressing to a Windows 2000 server
You can also add a second IP address and a default gateway to your servers
in Windows 2000 by first viewing your network properties and then selecting
the TCP/IP protocol stacks properties. You can then add your secondary addressing,
as shown in Figure C.
| Figure C |
| |
| Here is an example of adding a second IP address to a Windows 2000 server. |
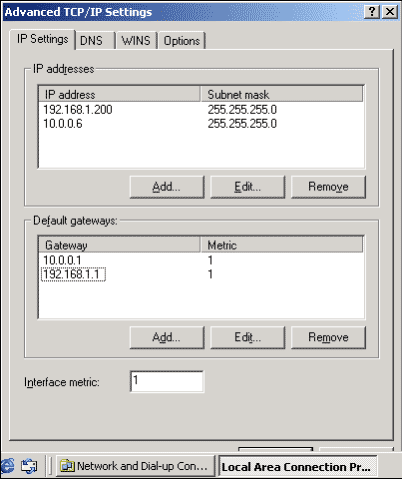
As you can see, adding a second IP address allows you to seamlessly integrate
a LAN segment from one address range to another without causing chaos to your
client community. Now that you have all of your devices statically set with
the new range, it’s time to work on the clients.
Dynamic addressing
Most network clients get their addresses from DHCP. It’s easier and more manageable
to use DHCP for client workstations than statically assigning them. Addresses
are doled out via a scope. A scope, as shown in Figure D, is what you
need to rebuild in order for your network to finish the cutover. To rebuild
a scope in Windows 2000, you can simply get your new scope up and ready—but
don’t activate it. In other words, you can have your regular scope still functional
and build a new one in the console, get it ready to go, but leave it inactive.
| Figure D |
| |
| Here is the Windows 2000 DHCP scope. |
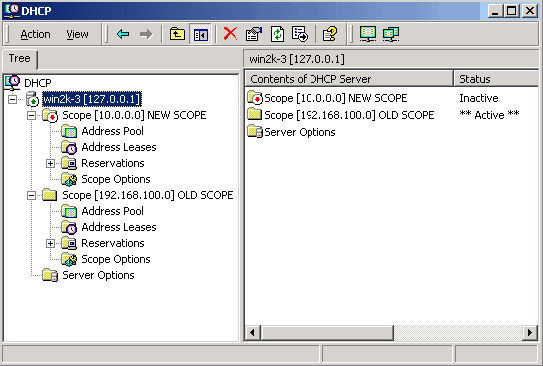
In Figure D, you can see that the normal scope in use (192.168.100.0) is operational,
and the new scope has a red arrow indicating that it is Inactive. In the right-hand
side of the DHCP MMC, you will see the details of what was just explained.
All you need to do is right-click the old scope and select Deactivate from
the Properties menu. Next, right-click the new scope you want to use and select
Activate.
Normally, it may take awhile to have your systems on the LAN renew their addresses,
so what I normally do for a shortcut before deactivating the scope is look
at the Address Leases icon and disconnect any users still seen in the console.
This ensures that those users will be off the old range. One last tip is to
have everyone shut down their systems before leaving work when you plan to
do this cutover. When the users come back in to work, they will boot up and
get a brand new IP address from the new range.
Author’s tip
I suggest statically setting up all secondary IP addressing and running massive
tests on connectivity with a single host on your network. You should do this
before cutting over the rest of your clients by rebuilding the scopes. You
may be missing things that you won’t come across until you test.
Test out the new subnet scheme
Before you call it a victory, you should make sure every application works
and check all your system logs (routers, switches, Event Viewer logs on your
servers, and so on). You may have some issues where you need to clear out
ARP caches on your switches or other devices because they will hold IP to
MAC address mappings that will not exist when the cutover is done. Test all
your systems and alert your help desk that it might be getting some calls
about issues resulting from your cutover.